You don't need anything connected to your Arduino for this sketch.
Step 1: Upload the Code (and Save As!):
Here's the code for exploring the Ultrasonic Ranger. Upload it to the robot and open the serial monitor. As a matter of general practice we upload the sketch while the Qbot is turned off. You will notice that with the Qbot off the serial monitor will keep reporting that the distance measurement is out of range. Watch what happens when you turn the Qbot on BUT are still connected to your computer (otherwise it can't talk to the serial monitor!).
/* Ultrasonic Ranger 7/7/2020 -- !! (public domain) The ultrasonic ranger is a SR04 type device. It is well documented in places like: https://www.makerguides.com/hc-sr04-arduino-tutorial/ After discorvering that my original schematic for the Qbot had an error in the trigger and echo pins assignments for the SR04 I eventually got it sorted and the pin assignments are trigger pin 3 echo pin 4 Comments have been updated for the Sonic I lab for GS104: Physics (Robotics) 7/7/20 Bruce Emerson */ // math.h is a library which makes useful special commands available // the format below is how we include any library of special commands #include<math.h> // For different robots the SR04 ranger may be connected to different pins // For the Qbot (current version 7/20) they are as below. int trigPin = 3; int echoPin = 4; // a float is what coding languages call decimal numbers. Up until now // we have primarily used integers (int) to decribe things like pins // for distance calculations with the ranger we need decimals rather // than integers. float distance; float speedSound = 334.0; // standard speed of sound in m/s // Because our distance determination depends on the precision of the // timing we use an extra precise variable called a 'long' for the // duration variable. long duration; void setup() { Serial.begin (9600); pinMode(trigPin, OUTPUT); // we use the trigPin to talk TO the robot pinMode(echoPin, INPUT); // we use the echoPin to get info FROM the robot } void loop() { // To send out the pulse of sound we have to make the trigger pin turn on // and then off. The pulse is sent when the trigger pin is turned off // (goes from HIGH to LOW). We start by making sure the switch is off before // we turn it on. It must stay on for at least 10 microsecond before turning // off. digitalWrite(trigPin, LOW); // make sure it's off delayMicroseconds(10); digitalWrite(trigPin, HIGH); // turn the trigger on delayMicroseconds(10); // wait 10 microseconds digitalWrite(trigPin, LOW); // turn the trigger off, this sends the pulse // After the pulse is sent we read the time it takes to come back using the // pulseIn() command from the math.h library duration = pulseIn(echoPin, HIGH); distance = (duration / 2) * (speedSound / 10000); // Then we communicate the measurement to the serial monitor so we can see // what is happening. When the robot is acting autonomously nobody will // notice because the serial monitor will be off. Serial.print("return delay (ms): "); Serial.println(duration); Serial.print("speed of sound: "); Serial.println(speedSound); // The SR04 has a minimum and maximum possible range. The conditional IF // command checks to see whether the calculated distance is appropriate // distance >= 400 means greater than or equal to 400 cm or 4 m // distance <= 2 means less than or equal to 2 cm // the || is a symbol that means 'or' // In english this statement says 'If the distance is greater than 4 m OR // less than 2 cm tell the user!' if (distance >= 400 || distance <= 2){ Serial.print("Distance = "); Serial.println("Out of range"); Serial.println(); // some blank lines to separate the different measurements
Serial.println(); } // If the distance is within the appropriate range print it out to the serial monitor. else { Serial.print("Distance = "); Serial.print(distance); Serial.println(" cm"); Serial.println(); // some blank lines to separate the different measurements
Serial.println(); delay(500); } Serial.println("next measurement"); delay(5000); // wait 5 s before the next measurement }
Step 2: Testing
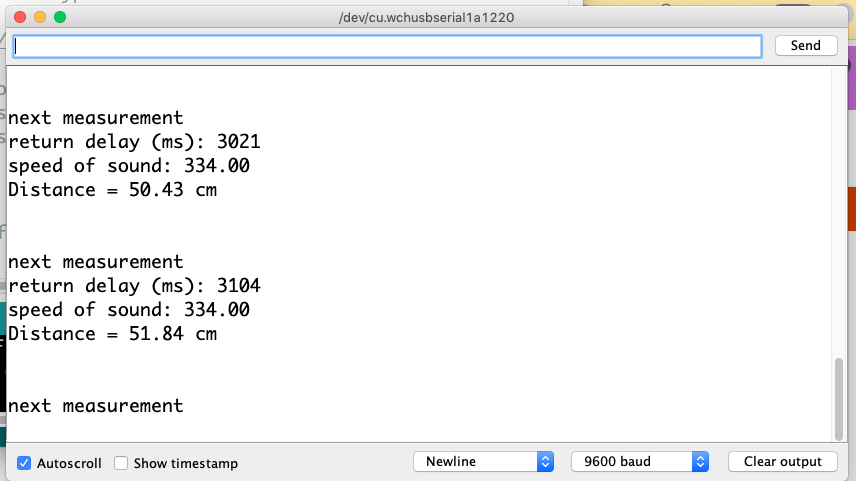
When you turn the robot on you should see it reporting the measurement being made by ranger. The screenshot below may give you a sense of what to expect. If everything is too far away or it is up against a wall the serial monitor will report that the measurement is 'out of range'. Otherwise it will report the distance it believes to be correct to the object in front of it. Start with a nice flat and hard surface like a wall in front of your robot. At the moment it only makes a measurement every 5 s so you have plenty of time to move the robot to a new location between each measurement.

Step 3: Done!
If everything seems reasonable then you may return to the main lab page.
