Purpose:
Now that we've sorted out the basics of how lab reports are constructed and submitted in this class we need to address the question of how we make measurements and what they mean. As you will find with many of the labs in this class there are several competing outcomes being pursued at the same time.
Statistics:
There are formal statistics and then there is the way we will do things in this class which is a sort of street statistics. The core issue is that there is no such thing as a perfect measurement. All measurements are necessarily flawed at some level. What's important is to know how much they are flawed and how they do or don't support a particular model of the situation we are looking at.
Utility:
It would be lovely if what we do in lab might also be mildly useful in life on the outside. This particular lab will explore a way of measuring distance that is used in some old school distance finders on the golf course. Our tool is for making angular measurements will also be useful in describing where the moon is in the sky for your moon journal. It is also useful in desribing where any object is in the sky that you want to ask about.
Remote vs Face-to-Face:
Since COVID began this class is sometimes taught Face-to-Face (f2f) and sometime in a remote format. In most cases you will be asked to almost the same task in either case. It is always more challenging to do the lab independently in the remote format. Be prepared to take extra time and notice if you have questions. Identify a lab buddy in the class that you can chat with or email if you have questions and can't get a hold of your instructor.
Procedure:
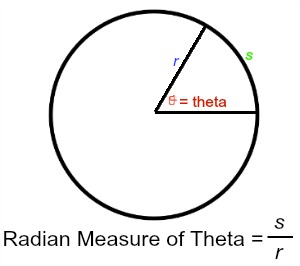
In this lab we will be using a different way of measuring angles than we commonly use in the everyday world. We are mostly used to measuring angles using degrees. Nothing wrong with that but in much of science we also use another measurement of angles called radians (rad). We define the measure of an angle in radians using this expression:
θ = s/r
...where the terms are defined as illustrated in the following graphic....

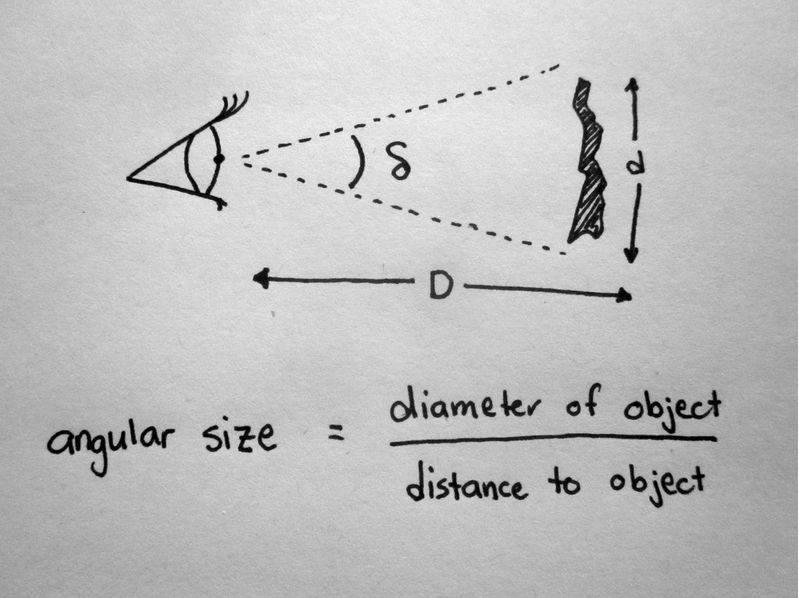
θ (theta) is a symbol that we commonly use to indicate an angle. s is a distance called the arc length and r is the radius of the circle. We can also think of r as the distance to the place where the arc length is being measured. Here is another representation of the same setting from a human perspective (in this one the angle is called δ - delta)
An Aside: It can be confusing when different symbols are used to represent the same concept. Unfortunately this is common in almost every discipline. Think of it like jeans, levis, dungarees, and carhartts. Four different words for pretty much the same item of clothing.

thanks to Gizmodo for use of the image
You'll notice that the arc length is a curve but d, in the image above, is not. If the angle is relatively small then the distance d is essentially the same as the arc length s and D is the same as r.
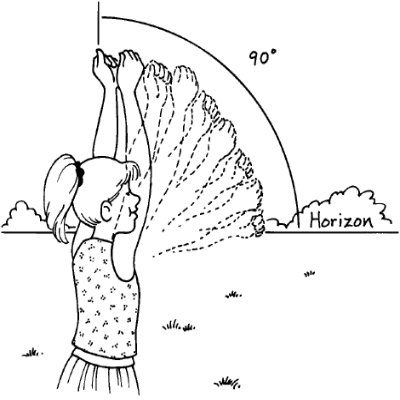
- We will start with a very conceptual experiment. As with all experiments keep track of your data from each trial. With your shoulders square (facing forward without twisting) make a gentle fist with each hand. Hold one hand in front of you so when you look across the top of your fist you are looking at the horizon (the flat line that would be the ocean if the mountains weren't there). Without moving your original fist 'stack' your other fist on top of the first one - this counts as 1. Check to make sure your shoulders are still square. Now bring your original fist around and stack it on top of the one you just 'stacked' without moving anything. There is a powerful tendency to move your hands as you do this so you will need to repeat the measurement a few times to be sure you're getting consistent results. Keep moving and 'stacking' your fists, and counting, until you are looking straight overhead. For nearly everyone this is between 9 and 11 fists from the horizon to the zenith (overhead). Divide 90o by the number of fists you stacked and you will get the angular size of your fist in degrees. Divide 1.57 (90o in radians) by the number of fists to get the angular size of your fist in radians. This image may help clarify the experiment.
When you are done with this activity you should know the angle that your fist covers aat arms length in both degrees and radians.

thanks to Step by Step for use of the image
- Next we will get a little more precise about measuring the angular size of your fist. Measure the width (top to bottom as you were holding it in front of you in the previous experiment) of your fist in mm using a meter stick or other measurement tool. Then, with your shoulders square measure the distance from the plane (front) of your face to your fist when it is held directly in front of you. This can be easier with a helper and try not to poke yourself in the eye! Draw a picture of your fist and your eye and relate it to the drawing earlier in this lab. The width of your fist is d (or s) and the distance from your face is r. Divide the width of your fist by the distance from the plane of your face (both in mm). Do you expect this to give you a small number or a big one? This is the angular size of your fist in radians (rad) or milliradians (mrad) if appropriate. How does this compare to your earlier measurement of the angular size of your fist?
If we are working in groups in regular lab gather the data and calculated results from everyone in your group so that you can present it in a table in your lab report. If you are doing this lab independently post your results in the lab discussion on the LMS. What is the smallest angular size of a fist in your group or on the discussion board? What is the largest? We generally expect this variation to be less that 10%, is it?
- Repeat the previous measurement for a single finger held horizontally at arms length. Compare your results to others in the class or post in the lab discussion as appropriate. You should expect this measurement to be about 1/4 of your previous measurement.
- Measuring Angular Size: To measure the angular size of something you hold up your fist at arms length to determine whether it 'covers' the object. This could be a tree or a building or a person. If the object is smaller than a fist you can use your fingers which are smaller.
- We can also use the angular size of our fists and fingers to determine the distance to an object of known height. In a f2f lab setting I will tape a 2 m stick to the wall at the far end of a hallway. If you are doing this independently have a friend (whose height you know) walk down to the other end of a city block. Measure the angular size of the 2 meter stick or your friend using your fist and/or your finger(s). Feel free to estimate fractions of your finger. A little under 2 fingers could be 1.8 fingers. A little more than 1 finger might be 1.3 fingers. 2.5 fingers should be a pretty comfortable call. Make a drawing showing your eye, your finger(s), and the known height. We will discuss how accurately we can reasonably do this and why. Using your unit conversion skills convert the 'fingers' needed to cover the known height to radians. You now know θ and d (or s). Rearrange our expression θ = s/r to determine r which is the distance to the known height. This could be the length of the hallway or the distance down the block to your friend. You should expect that you will get different results than others in the class because of natural variation in their measurement process not because the hallway changes length.
- For standard f2f labs we will gather all the data on the whiteboard and discuss any patterns or unexpected measurements. We will calculate the mean and the median of our measurements. We will have a discussion about errors and data quality and the probable length of the hallway. I may or may not (probably not:)) share the actual length of the hall with you. If you are doing the lab independently you may skip this part.
- Your final assignment for the lab is to determine how far away some distance object is. If you live in Bend, Madras, or Redmond you will use the North or South Sister. In Prineville you will use the rim south of the COCC campus (south of the center of town). The height above the horizon for each of these objects is given in the table below. You will find this exercise most meaningful if you estimate the angular height in fractions of your finger for better precision. This process is the same as what you did in the hallway though it may feel different.
For students who are not in Central Oregon you will need to look up (on web) the elevation of a nearby mountain or peak and subtract the elevation where you are standing. Convert this elevation difference between you and the top of the mountain into meters. This is what you will use instead of the numbers in the table below.
| South Sister | North Sister | Mt Jefferson | Mt Ashland | Prineville Rim | |
| Redmond | 2200 m | 2100 m | 800 m | ||
| Madras | 2500 m | 2400 m | 1100 m | ||
| Prineville | 1100 m | 120 m | |||
| Ashland | 1600 m |
LAB DELIVERABLES: (Turn in on Bb)
I) Write a short introductory paragraph describing what this lab is about and identifying your group members by name. If you are doing the lab independently make a note to this effect.
II) Present your data and calculations determining the angular size of your fist in degrees and radians from the first experiment counting fists from the horizon to the zenith (overhead).
III) Present a table showing your data and the process of calculating the angular size of your fist and finger in radians or mrads from direct measurements. Include the data and results for two members of your group (or another student from the discussion board in the LMS). Be sure to include a sketch of the experimental setting with labels showing what was measured.
IV) Comment on how the angular size of your fist and finger compare to others in the class. How different are they (in %)? Are they more consistent than you expected? Compare and comment on the determination of the angular size of your fist in the first experiment relative to the second experiment.
V) Present a data (in a table) for your determination of the length of the hallway or length of the city block. Show an example of how you calculated this distance from the data with another illustration showing the experimental setting with labels.
VI) (only for f2f) Present a table showing the calculated length of the hallway from each member of the class. Show your calculations for the mean and median of this set of data. How long do you think the hallway actually is and explain why you believe this.
VII) Present your data and calculation of the distance to the distant landmark you chose from the list of possibilities. As always include a sketch with labels.
