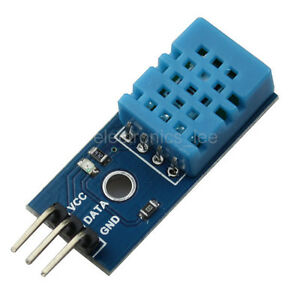
DHT11 Temp Sensor:

Step 1: DHT11 Temperature Sensor
The TMP36 temperature sensor lab introduces us to reading voltages from sensors that respond to their environment. The DHT11 sensor communicates the temperature directly as a digital value using a 1 wire serial communication protocol. This makes it a different sort of tool. Not a bad tool but different. The DHT11 sensor is the blue perforated object with 4 wires that is attached to the small breadboard in the image above. Most of the time the DHT11 sensor comes packaged on a small board that includes protective resistors and capacitors recommended by the manufacturer. If you have a 'naked' DHT11 sensor you will need to provide those yourself.
There are three pins that are required to integrate a DHT11 sensor into your circuit. The usual Vcc and GND pins are connected to your power source which can be the Arduino. GND goes to 0 V and Vcc can be connected to the 3.3 V or 5 V pins (DHT11 accepts 3.0 - 5.5 V for Vcc). The data pin is the one that will communicate the temperature back to the Arduino. For details of that communication process you can explore pages 5-7 of the datasheet linked above. You will need to check and be sure that you have identified which pin is which on your version of the DHT11. You may need a magnifying glass to see the small printed labels on the breadboard.
On mine the first pin on the left is the data pin, the middle pin is Vcc, and the right pin is GND.
Step 2: Upload the Code (and Save As!):
Here's the code for exploring the DHT11. You will notice that it uses the serial monitor to communicate with you and reports the temperature in C and F. The DHT11 sensor also provides humidity readings as well. The example code computes the heat index from the relationship between the humidity and temperature.
/*
Example testing sketch for various DHT humidity/temperature sensors
Written by ladyada, public domainREQUIRES the following Arduino libraries:
- DHT Sensor Library: https://github.com/adafruit/DHT-sensor-library
- Adafruit Unified Sensor Lib: https://github.com/adafruit/Adafruit_SensorThis version of DHTtester has been modified and presumes that your DHT
is mounted on a small breadboard with appropriate pull up resistors and
decoupling capacitors already installed. - BEModified and commented by bemerson 4/2021
*/// This library contains packaged commands to communicate with the DHT device
#include "DHT.h"// define Digital pin connected to the DHT sensor to communicate
#define DHTPIN 4// Uncomment whatever type you're using!
#define DHTTYPE DHT11 // DHT 11
//#define DHTTYPE DHT22 // DHT 22 (AM2302), AM2321
//#define DHTTYPE DHT21 // DHT 21 (AM2301)// Connect Vcc pin (check your board!) of the sensor to +5V
// Connect data pin (check your board!) of the sensor to whatever your DHTPIN is
// Connect GND pin (check your board!) of the sensor to GROUND// Initialize DHT sensor.
// This sets up the communication with the DHT
// This is much like the Serial.begin() process of starting the
// serial monitor.
DHT dht(DHTPIN, DHTTYPE);void setup() {
Serial.begin(9600);
Serial.println(F("DHTxx test!"));dht.begin();
}void loop() {
// Wait a few seconds between measurements. This can be adjusted
delay(2000);// Reading temperature or humidity takes about 250 milliseconds!
// Sensor readings may also be up to 2 seconds 'old' (its a very slow sensor)
float h = dht.readHumidity();
// Read temperature as Celsius (the default)
float t = dht.readTemperature();
// Read temperature as Fahrenheit (isFahrenheit = true)
float f = dht.readTemperature(true);// Check if any reads failed and exit early (to try again).
if (isnan(h) || isnan(t) || isnan(f)) {
Serial.println(F("Failed to read from DHT sensor!"));
return;
}// Compute heat index in Fahrenheit (the default)
float hif = dht.computeHeatIndex(f, h);
// Compute heat index in Celsius (isFahreheit = false)
float hic = dht.computeHeatIndex(t, h, false);Serial.print(F("Humidity: "));
Serial.print(h);
Serial.print(F("% Temperature: "));
Serial.print(t);
Serial.print(F("°C "));
Serial.print(f);
Serial.print(F("°F Heat index: "));
Serial.print(hic);
Serial.print(F("°C "));
Serial.print(hif);
Serial.println(F("°F"));
}
Step 3: Learning
You will find that this sensor is a little slower to respond than the TMP36 since you can't touch the sensor directly. If you wrap your hand or a warm towel around the sensor you can see the temperature change.
Step 4: Experimenting
Consider how using this sensor might be different than using the TMP36.
