Purpose:
Now that you are comfortable accessing your Arduino and understand the basic structure of a sketch it's time to start doing something useful with it. One can divide the tasks that an Arduino can do into two broad classes. Sensing things (gathering information about the world) or Actuating things (creating an action in the world). Almost all the other things we do with Arduinos are about managing these two kinds of tasks. This is your first sensor lab. You will learn how to read a temperature from the TMP36 sensor and then report it to the user on the Serial Monitor. In addition you will be asked to turn on an LED if the temperature goes above a certain set point. These are all basic skills for using Arduinos.
Procedure:
- For this lab you will need your Arduino, the TMP36 temperature sensor (from the PH212 Lab kit), your breadboard, and some jumper wires, and a bunch of other stuff.
i) When you want to see what the Arduino is doing it can communicate with you and you can feed it information via the serial monitor. Explore this Serial Monitor activity to get a sense for how the serial monitor does this.
ii) Any time you are using some new device it is worth your time to search for the datasheet that describes it. The datasheet will have way more information than you probably need but at the very least it will tell you which pins (legs) are for what purpose. This may seem obvious but should you count from the left, from the right, looking down from above, what does above even mean? I didn't stop to think or look and wired mine up backwards and about burned it up. What are max and min temperatures you can measure? Here is the TMP36 datasheet as a pdf.
The description of how the pins on the TMP36 are numbered is on page 1 of the datasheet. The description of the function of the different pins (legs) is on page 10. From a learning perspective we need to clarify some language. VS is a label that is usually used to mean the supply voltage and is typically in some range as well as whether the voltage should be + or - (either is possible). What is the range described for the TMP36? GND is the label commonly used for 'ground' which is typically 0 V. The other symbol here is Vout which identifies the output pin that provides information to the outside world.
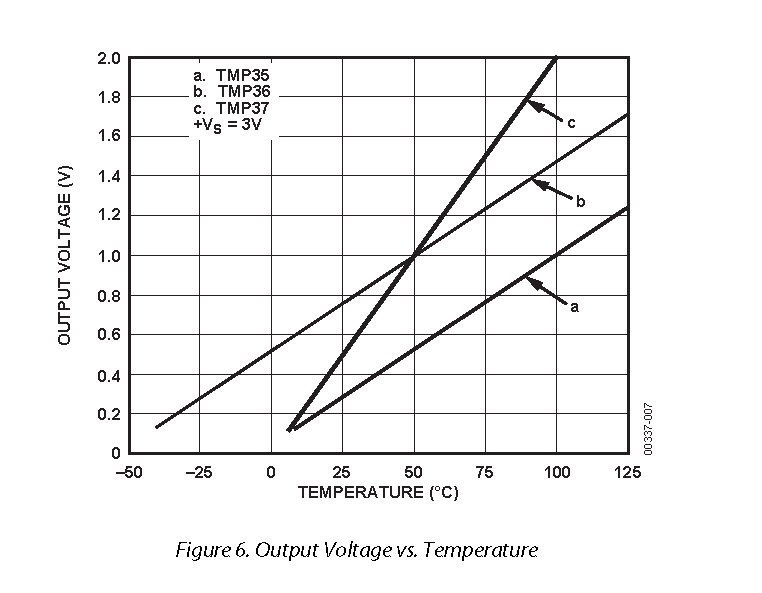
iii) Using the TMP36 to measure temperatures is pretty straightforward so this lab is really about how to gather data from a sensor in general and the TMP36 keeps the sensor part simple. Below is a plot of the output voltage of the TMP36 as a function of temperature. What do you notice about relationship between the output voltage and the temperature? Which pin of the TMP36 (look at the datasheet) is the output? All we gotta do is measure that voltage and we're golden!

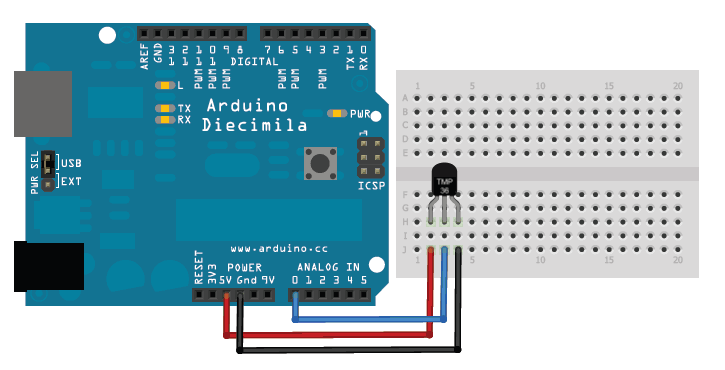
iv) Here is a link to the Adafruit guide to the TMP36. All I want you to focus on is the wiring diagram from that page shown below. We will be doing slightly different things with the code.
Best Practice: The best practice for wiring Arduino circuits is to unplug your Arduino while you do the wiring. You will definitely see people working on their circuits while the system is 'HOT' but this occasionally leads to trouble. When your circuit is wired and visually checked then plug in the Arduino and see if things work. If something needs to be changed unplug the power from the Arduino, make the change, and then reconnect the power.
Get it wired up with the FOLLOWING CHANGE: Red Wire to 3.3 V INSTEAD OF 5 V! It works both ways but at one point mine seemed to get too hot on 5 V in spite of what the datasheet says. The next day it seemed to be OK but why take the risk. Show your circuit to someone else in your household or the class and see if they agree you have wired it up the same:)

Best Practice: Another best practice is to be very attentive to heat and smell when you first power up a new circuit. In this case when you first power up the Arduino keep gently touching the TMP36 sensor (the black plastic case) and see if it's getting hot. Be careful, sometimes things heat up quite quickly and I have blistered my fingertips occasionally by not being careful enough. Smell is also an important tool since warm plastic has a characteristic smell that you may come to learn. Be ready to unplug if things seem wrong.
v) Here's the starting code and some instructions for getting your temperature sensor up and running and talking to your serial monitor. Once you have it running successfully take it around and measure the temperature of your room/house, something much cooler than your environment (like a fridge or freezer), and something above body temperature. For your lab report you need to have all three of these measurements showing in your serial monitor and take a screen shot of them. That would imply a fairly long time between measurements if all three need to show on your screen shot at the same time (hint hint).
vi) Here is a little add on to your sketch that will allow you to turn on your LED from last week when the temperature goes above a certain set point. You will have to make a number of adjustments to make this work for you. This is no gimme. This is a useful option in a greenhouse if the you replace the LED with a fan!
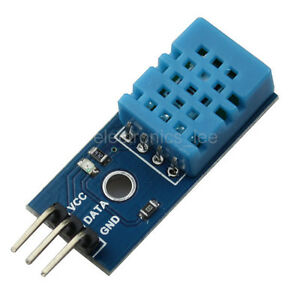
vii) Bonus Round: Most of your kits have a different temperature sensor called a DHT11 temperature sensor. It looks something like the image below. This page will walk you through how to communicate with your DHT11 temperature sensor if you have one in your kit.

- LAB DELIVERABLES:
-
I) On a page with your name etc embed a screenshot of your serial monitor showing the three requested temperatures. Describe the locaion of each measured temperature. That's it. We're focusing a little more of skills demonstration in the lab at this point. Don't worry, we'll get back to the notebook stuff once we start taking any analyzing data.
