Purpose:
Now we're getting to the place that you have a general sense of how your Arduino works and how to write a little code. The question is - "How to turn something on or off that takes 50V or 250 mA at 5V?". This is where it's important to start to recognize the Arduino as a controller not as the actual driver. So how do we use the Arduino to turn on something that requires more current or voltage and it can handle directly.
The first order of business is to recognize that we need to sketch and think first before wiring things up and setting the Arduino loose. This has worked pretty well up to this point because we have been using pretty standard tutorials from the Arduino community. We could keep doing that but I want to move towards a situation where you use your analytic skills to figure out what is going on logically before getting physical with your circuit. An important part of this process is to learn to read data sheets.
The basic structure of this lab is to use a relay to turn on a 12V device of some kind. We will need to use the power supplies we learned to hack a couple of weeks ago along with the special jumper wires we made to access the wire harness. Here is a video discussing relay blocks for Arduinos. We may be starting with just the relay itself and not the lovely packaged relay block.
Procedure:
1) You are given that you will be using your Arduino to turn on a 12V device. It will most likely be a fan of some kind. We will worry later about stepper motors which are a whole different kettle of fish. These days most of you have relay blocks in your kits and I have some extras for you to borrow if you don't. While my inclination is to make you build the whole relay circuit it's probably not the most useful for you. Here is the datasheet for a 2 relay board that is typical.
There is actually quite a bit to figure out before actually wiring this board into an Arduino circuit. Start by reading the document and understanding what the relay does and roughly how you control it. Be sure to sort out whether you turn the relay on by sending a digital HIGH or a digital LOW to the control pin IN1 or IN2. Is there a safe amount of current being drawn into your Arduino control pin? Convince me!
I have also tracked down the data sheet for the actual relay that's on my board. On the circuit schematic is shows the Arduino providing the current to the relay coil (at 5 V). Given the information on the datasheet how much current will the coil require from the Arduino? Is this safe? We will discuss this in class.
How much current can the relay contacts handle, at what voltage, and how fast? This is generally relevant because sometimes you want to turn things on and off in rapid succession and a relay may not be fast enough.
Finally, sketch a circuit drawing to control the relay with no voltage or load to the contacts. Because the relay is a mechanical device you will be able to hear it click when you activate it.
2) Build the circuit you have sketched and demonstrate that you can control the switching speed and duration to the instructor or your fellow students.
3) Determine how to connect a 12 V fan or motor to your relay (remove power from your Arduino first please). The fan portion of your circuit is completely separate from your Arduino electronics and will require that you use one of the computer power supplies to provide the 12V and the ground. You may need to do a little fussing with wires (perhaps even some soldering) to accomplish this. The 100 -200 mA that the fan needs can be handled by the Arduino jumper wires so you don't need heavier wires (see the chart in the Lab Resources page -- Arduino jumper wires are typically 22 ga).
After your circuit has been examined by the instructor or two thoughtful students you may power it up and demonstrate that you can turn the fan off or on at will (remind you of the serial monitor and the LED sketch?).
4) What happens if you turn on the fan for 20 ms and then rest for 60 ms and repeat that cycle for 2 s? This is an example of managing the duty cycle. 100% duty cycle is on all the time and 0% duty cycle is off all of the time. What you have just done is a 25% duty cycle (on 25% of the time). This essentially the same as PWM (Pulse Width Modulation) that the Arduino uses to make the digital output pins appear lower voltage (or to dim the LED). Will the relay keep up if you try to do this as 2 ms on and 6 ms off?
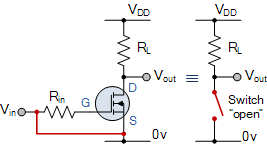
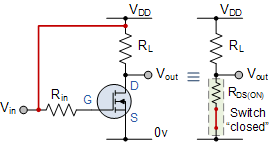
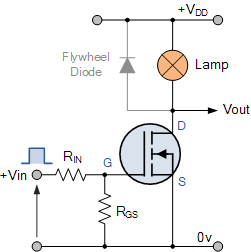
5) A transistor is a form of a switch that the Arduino can control. There are many different styles of transistors and it's not clear what I will have lying around for you. Look at the datasheets for the ones I have available (on the resource page) and compare the drain or collector current to what your fan needs. Also look at the switching speeds compared to teh relay. Generally we pick the 'smallest' transistor that will comfortably handle the current. Also look at gate voltages and currents. Here are three images showing an FET transistor 'turned off', 'turned on', and in a circuit. Regular transistors work essentially the same way.
Study these and update your schematic to show where you would place the IRL520 in your circuit to replace the relay. You will need to consult the data sheet to determine appropriate gate voltages. The characteristic you are looking at is the gate - source threshold and maximum voltages. The current that is being drawn by the transistor is the gate-source leakage current. Check your circuit with me before firing it up.
6) Demonstrate that you can accomplish the same performance of your fan using the IRL 520 to control the current instead of the relay. Why would you choose one or the other in a given application?
- LAB Deliverables:
1) Demonstrate that your Arduino circuit(s) performs the task(s) described above after your thoughtful design and analysis.
This link provides a central location for documents and links specifically relevant to this lab.
More general resources for this course and the lab are accessible from the Web Resources page.
Reference Note if you come back to this at some later point in your life: The 5V pin on the Arduino Uno can provide up to 400 mA (in some cases up to 1A) of current for things like coils etc ONLY WHEN IT IS CONNECTED TO THE USB!.
